×

php up to date

How to install new theme in osClass?

How to install new theme in osClass?


01 - Where to install?


Unzip your plugin .zip file in the following folder:

{path to my website}/oc-content/themes/


01 - Go to your admin panel


Normally located at http://{my website url}/oc-admin


02 - Go to "Apearance/Themes"


06 - Find your theme on the list


07 - Click "Activate"


06 - All done!


Easy hum? Now you can try many diferent free and paid themes available on the web for Osclass platform.

How to Install a RocketTheme phpBB Style

How to Install a RocketTheme phpBB Style

How to Install a RocketTheme phpBB Style

Step 1: Download the Style

Downloading a RocketTheme phpBB style is pretty simple. All you need to do is navigate to the desired style of your choice on RocketTheme.com and click the Download link. From here, you will be taken to a page with three primary download options, along with the image sources you can use as a reference to customize images used in the style. These packages include:
  • Style: This is a style package that includes just the files needed to install the style on your existing site. Only choose this option if you already have the latest RokBB installed. It is most commonly selected by users that are switching from one RocketTheme phpBB style to another.
  • Bundle: This package includes the style and the latest RokBB version. It is the preferred download option if you are installing a RocketTheme style for the first time.
  • RocketLauncher: This package contains a full latest version of phpBB install, as well as the style, latest RokBB, and demo sample content allowing you to easily deploy your chosen forum with a few clicks. This should only be used if you are creating a new phpBB install. Existing sites should be created using either the Style or Bundle options.
NOTE: We always recommend installing a RocketLauncher first to trial and understand the style more efficiently. It contains sample content and initial configuration. It is ready for further customizations. It must be installed as new, and not over an existing phpBB install.

Step 2: Unzip and Upload

Once you have downloaded your selected package, you can unzip it locally or choose to do so after the initial upload. In the case of the Bundle package, the unzipped package will include two additional zip files. One includes the style itself, and the other RokBB.
Uploading the new Style involves moving the folder containing the style into the Style folder within your main phpBB directory. For example, if you are installing the Acacia style, you will place the Acacia folder (and its associated contents) into the pbpBB -> Styles directory where the phpBB directory is whichever directory on your server that acts as the root folder for your phpBB installation.
NOTE: You can upload all the files via FTP, or use cPanel or SSH to upload the zip and unzip directly onto the server. Inquire with your hosting provider.

Step 3: Activation

1
Once your style is uploaded, you can activate it and set it to default by accessing the Administration Control Panel (ACP). From there, navigate to the Styles tab and select Install next to the style you have just uploaded. If your style does not appear in this list, it may have been placed in the wrong folder.
1
2
After you have set these options, simply select Submit to complete installation.

Installing Administrative Modules

When installing RokBB, the contents of the downloaded ZIP file you receive from RocketTheme can be uploaded directly to your phpBB installation. Here is a quick list of critical files contained within:
FileUpload to
menunav.phpphpBB root directory
rokbb.phpphpBB root directory
adm/rokbbyour_phpbb_root/adm/
adm/style/acp_rokbb.htmlyour_phpbb_root/adm/style/
includes/rokbbyour_phpbb_root/includes/
includes/acp/acp_rokbb.phpyour_phpbb_root/includes/acp/
includes/acp/info/acp_rokbb.phpyour_phpbb_root/includes/acp/info/
language/en/acp_rokbb.phpyour_phpbb_root/language/en/
After this this done, log in to the phpBB Administration Control Panel and change the following settings:
1
2
  • General → Server configuration → Load settings → Recompile stale style components to Yes
  • General → Server configuration → Security Settings → Allow php in templates to Yes
Purge the cache in General tab. After emptying cache, complete following steps:
1
  • Go to the System tab → Module Management category → Administration Control Panel.
  • Select Styles in the Module management list.
  • At the bottom-left module creation field, type RocketTheme Styles then press the Create new module button.
  • Make sure Module is enabled and Module Type - Category is selected.
  • Press Submit.
  • Click on the newly created RocketTheme Styles category.
  • Now we can add the style modules for configuration. There is a dropdown list at the bottom right where you can browse and select the preferred ones. Find your style and add it for configuration.
  • Press Add module.
  • Do the same with Global Configuration.
  • After adding it. Press Enable to make the module active.
  • Now go to the Styles tab at the top. RocketTheme Styles category is third in a row. You can now select the Acacia style and configure it is options.
NOTE: You can add as many style modules as you want. After making changes, including installing new styles, remember to clear/refresh the cache. For any changes to be visible on the frontend of the site, the cache needs to be properly cleared.
Do not be worried about the installation process, as we only need this operation to be executed once. After that, upgrading RokBB will only involve replacing files.

NOTE: There are currently three RokBB editions available. This includes: RokBB 3 and RokBB 5 for Club members, and a free version we've made available to non-members that works with our trimmed-down free styles. If you are using a paid style, make sure you're not using the free edition of RokBB.

How to import xml file contents in wordpress import tool


How to import xml file contents in wordpress import tool


Click tootls----and then click import ---then click ---wordpress download and run installer----
then import your xml file thats all ...

your demo contend imported successfully.

Template Customization in blog

blog template customization


Style customization

Go To>>>Template >>>>Edit HTML

If your are having good skill in css just insert your css just before */]]></b:skin>
that is all your style now coming in live.

Script customization

  If you want insert your script to blog just insert before </head> tag in the template.

finally 

your HTML code placed under <body> tag

Divide a page header, content and footer using php

Divide a page header, content and footer using php


Now we see how to divide a page header, content and footer using php. It is usefull for if you have many pages in your website.If you create a header page you can avoid code repeat in all pages. you can simply call the header on all the pages. step 1:      create a header.php  header consist of doctype, title, meta tage, script style and body and menustep2:      create a footer.php  footer consist of all the bottom level menu and copyright information and privacy policy.step3:      create a page as many as you want with .php extensiton. tope of the page include('header.php'),  and bottom of the page write include('footer.php').  note: html,body opening tag comes under header.php and html,body closing tag comes under footer.php.you can write your js script either footer or header based on your needs.

Adding a PayPal Payment Widget to The Sidebar of Your WordPress Site

Adding a PayPal Payment Widget to The Sidebar of Your WordPress Site


Step 1) Grab the Free PayPal Payment Accept Plugin
Download and install the PayPal payment accept plugin in your site.

Step 2) Add a Text Widget to Your Sidebar

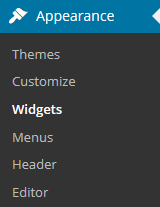
Go to the “Widgets” menu from your WordPress admin dashboard:
wordpress-widgets-menu-screenshot
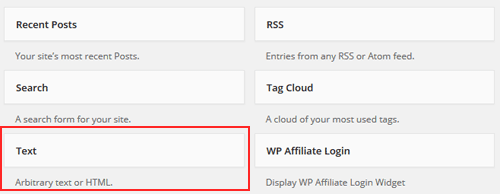
Find the standard WordPress “Text” widget and add it to your sidebar (where you want to show payment widget):
wordpress-text-widget-screenshot
You can drag and drop the widget or click on it then select the sidebar to add it to (if you have multiple sidebar areas).

Step 3) Add the Payment Widget Shortcode

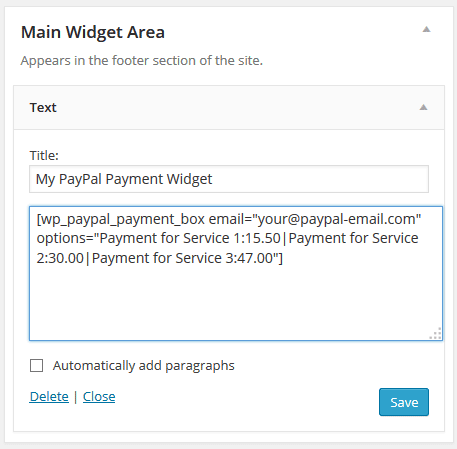
Now, you are ready to insert the payment shortcode into this text widget:
wordpress-paypal-payment-widget-shortcode
You can get a list of all the payment widget shortcodes from this page.

Payment Widget Example Output

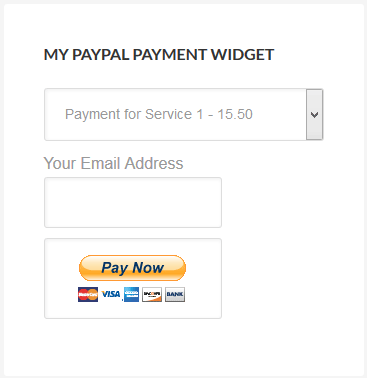
If you have done everything correctly, the payment widget will now show on your sidebar like the following example:
sidebar-paypal-paymen-widget-example

Removing Extensions from url

Removing Extensions from url


To remove the .php extension from a PHP file for example yoursite.com/wallpaper.php to yoursite.com/wallpaper you have to add the following code inside the .htaccess file:
RewriteEngine On
RewriteCond %{REQUEST_FILENAME} !-f
RewriteRule ^([^\.]+)$ $1.php [NC,L]

Adding trailing slashes at last 
I received many requests asking how to add a trailing slash at the end. Ignore the first snippet and insert the following code. The first four lines deal with the removal of the extension and the following, with the addition of the trailing slash and redirecting. Link to the HTML or PHP file as shown above. Don’t forget to change the code if you want it applied to an HTML file.
RewriteEngine On
RewriteCond %{REQUEST_FILENAME} !-f
RewriteRule ^([^/]+)/$ $1.php
RewriteRule ^([^/]+)/([^/]+)/$ /$1/$2.php
RewriteCond %{REQUEST_FILENAME} !-f
RewriteCond %{REQUEST_FILENAME} !-d
RewriteCond %{REQUEST_URI} !(\.[a-zA-Z0-9]{1,5}|/)$
RewriteRule (.*)$ /$1/ [R=301,L]
Feel free to command if you have any doubts in this topic

About phpBB

About phpBB
Community based open source php script. Mostly used for forums.
phpBB is one of the most widely used free discussion board scripts. This free and very powerful application is easy to install and administer. It allows flexibility in terms of design and organization. With SiteGround's hpBBhosting package you can use all phpBB features.
With the release of the phpBB3 branch this free discussion board has become even more popular. Lots of new functionalities have been added. Basically it is a whole new application and not an upgrade of the old release.
Fortunately, there is an option to convert a phpBB2 forum tophpBB3 retaining all the content and registered users.

Wordpress Change admin url

Wordpress Change admin url


  1. Add constant to wp-config.php
  2. define('WP_ADMIN_DIR', 'secret-folder');  
    define( 'ADMIN_COOKIE_PATH', SITECOOKIEPATH . WP_ADMIN_DIR);  
  3. Add below filter to functions.php
    add_filter('site_url',  'wpadmin_filter', 10, 3);  
    
    function wpadmin_filter( $url, $path, $orig_scheme ) {  
        $old  = array( "/(wp-admin)/");  
        $admin_dir = WP_ADMIN_DIR;  
        $new  = array($admin_dir);  
        return preg_replace( $old, $new, $url, 1);  
    }
  4. Add below line to .htaccess file
    RewriteRule ^secret-folder/(.*) wp-admin/$1?%{QUERY_STRING} [L]

For more reference visit